This blog post is part 2 in a series of blog posts.
- Part 1: How to pair AWS Cognito with Authsignal to rapidly implement passwordless login and MFA.
- Part 2: How to pair AWS Cognito with Authsignal to implement passkeys in a web app.
- Part 3: How to pair AWS Cognito with Authsignal to implement passkeys in a native mobile app.
In a previous blog post, we outlined how to pair AWS Cognito with Authsignal to implement passwordless login and MFA. The blog post focused on how to use the Authsignal pre-built to present an email OTP challenge for a passwordless login scenario - although you can just as easily configure the pre-built UI to enable other authentication methods.
This blog post will step through how to expand on the previous example by adding support for passkeys. Passkeys are a secure, unphishable authentication factor and offer a seamless and user-friendly experience. While passkeys can be automatically synced between and used across different devices, it’s still possible that users may occasionally find themselves in situations where a passkey they previously created isn’t available; for example, if they’ve switched to a new device on a different platform, or if they’ve deleted the passkey from their password manager (e.g., iCloud Keychain or Google Password Manager). For this reason, it’s a good idea to also allow another factor like email OTP in addition to passkeys so that users have something to fall back on if their passkey isn’t available. This blog post will show how to prompt the user to create a passkey after first verifying their email so that email OTP is still available as a recovery factor.
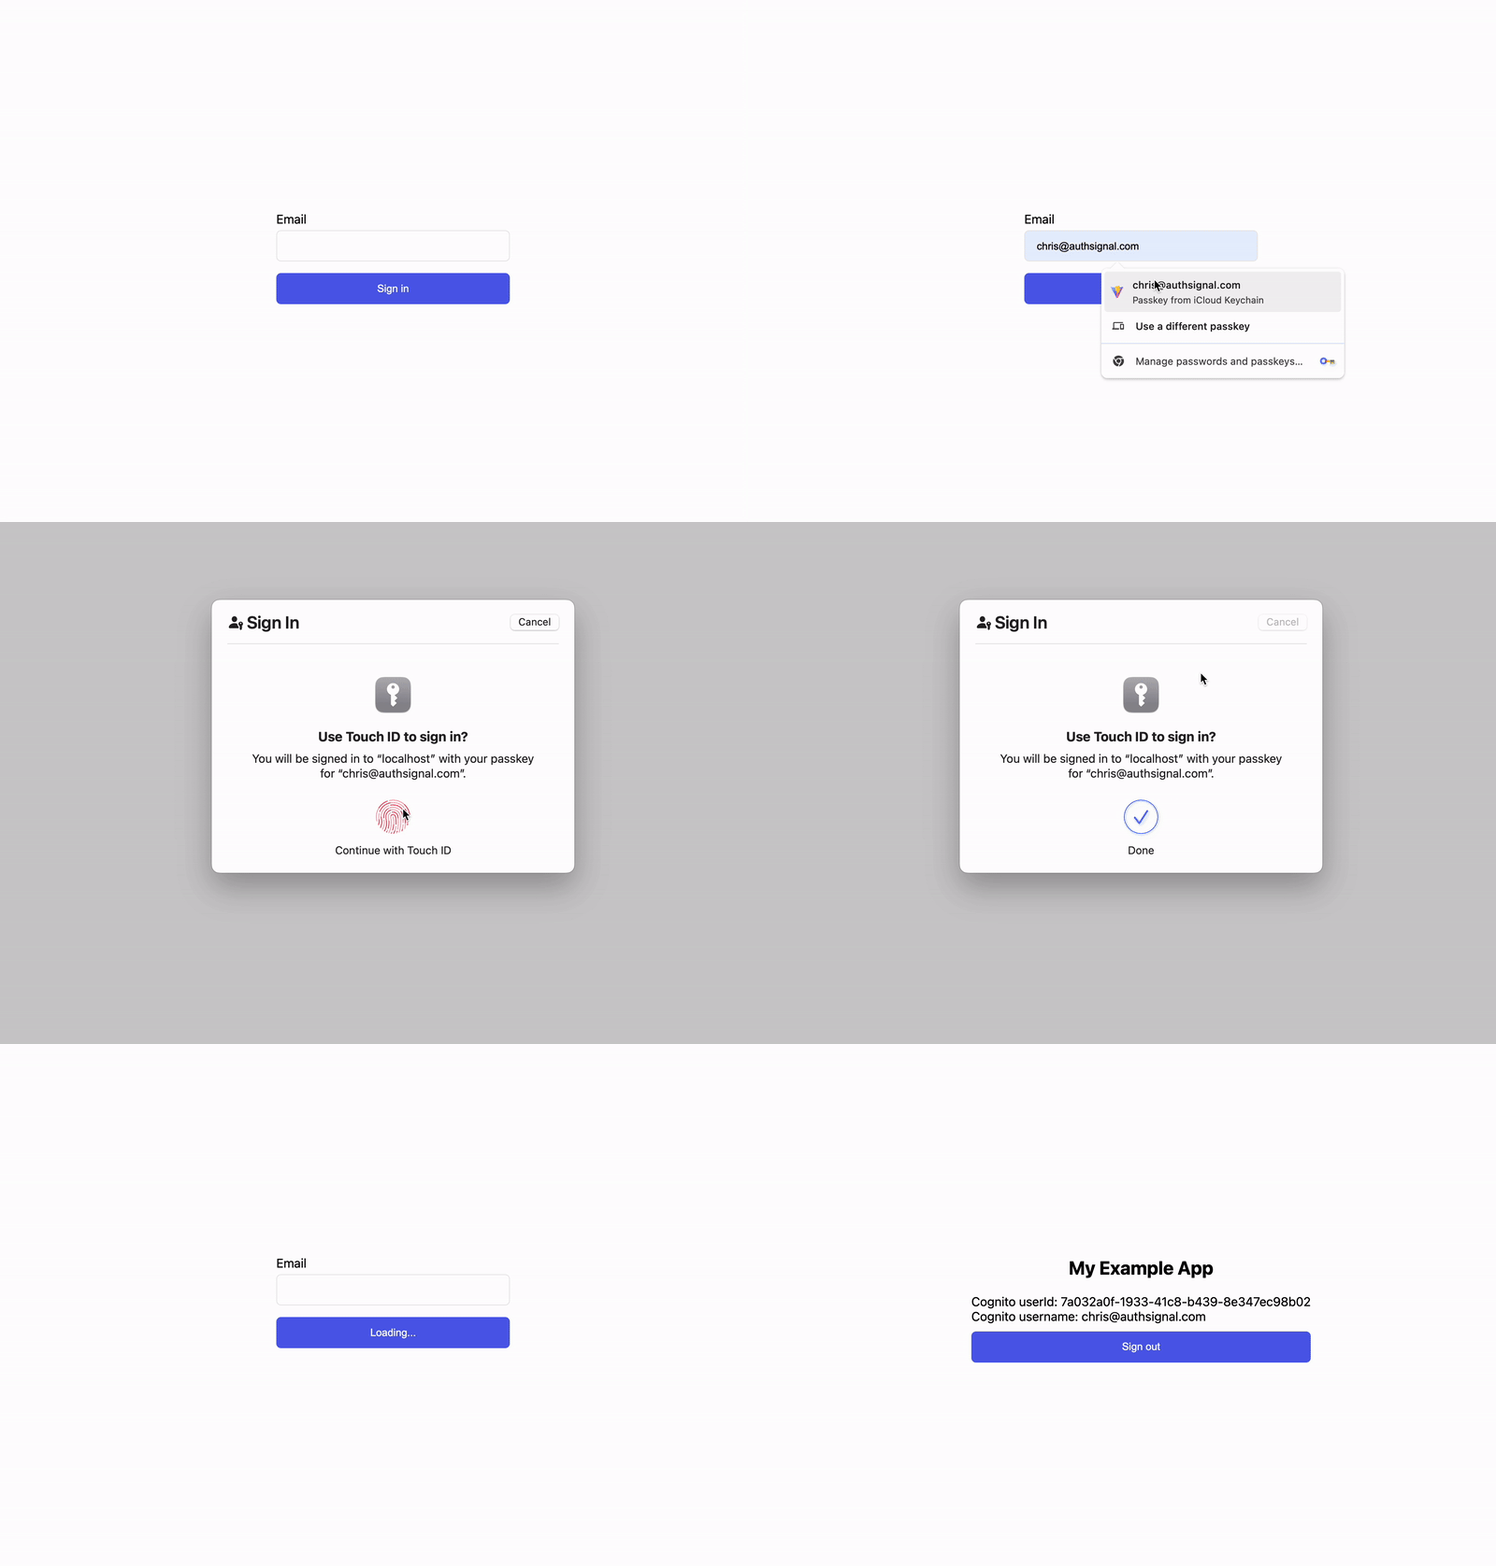
Using passkey autofill to sign in:
Full example code
You can find the full code example for using AWS Cognito with passkeys on Github or view just the diff of changes required to add passkey autofill.
Configuring passkeys in the Authsignal Portal
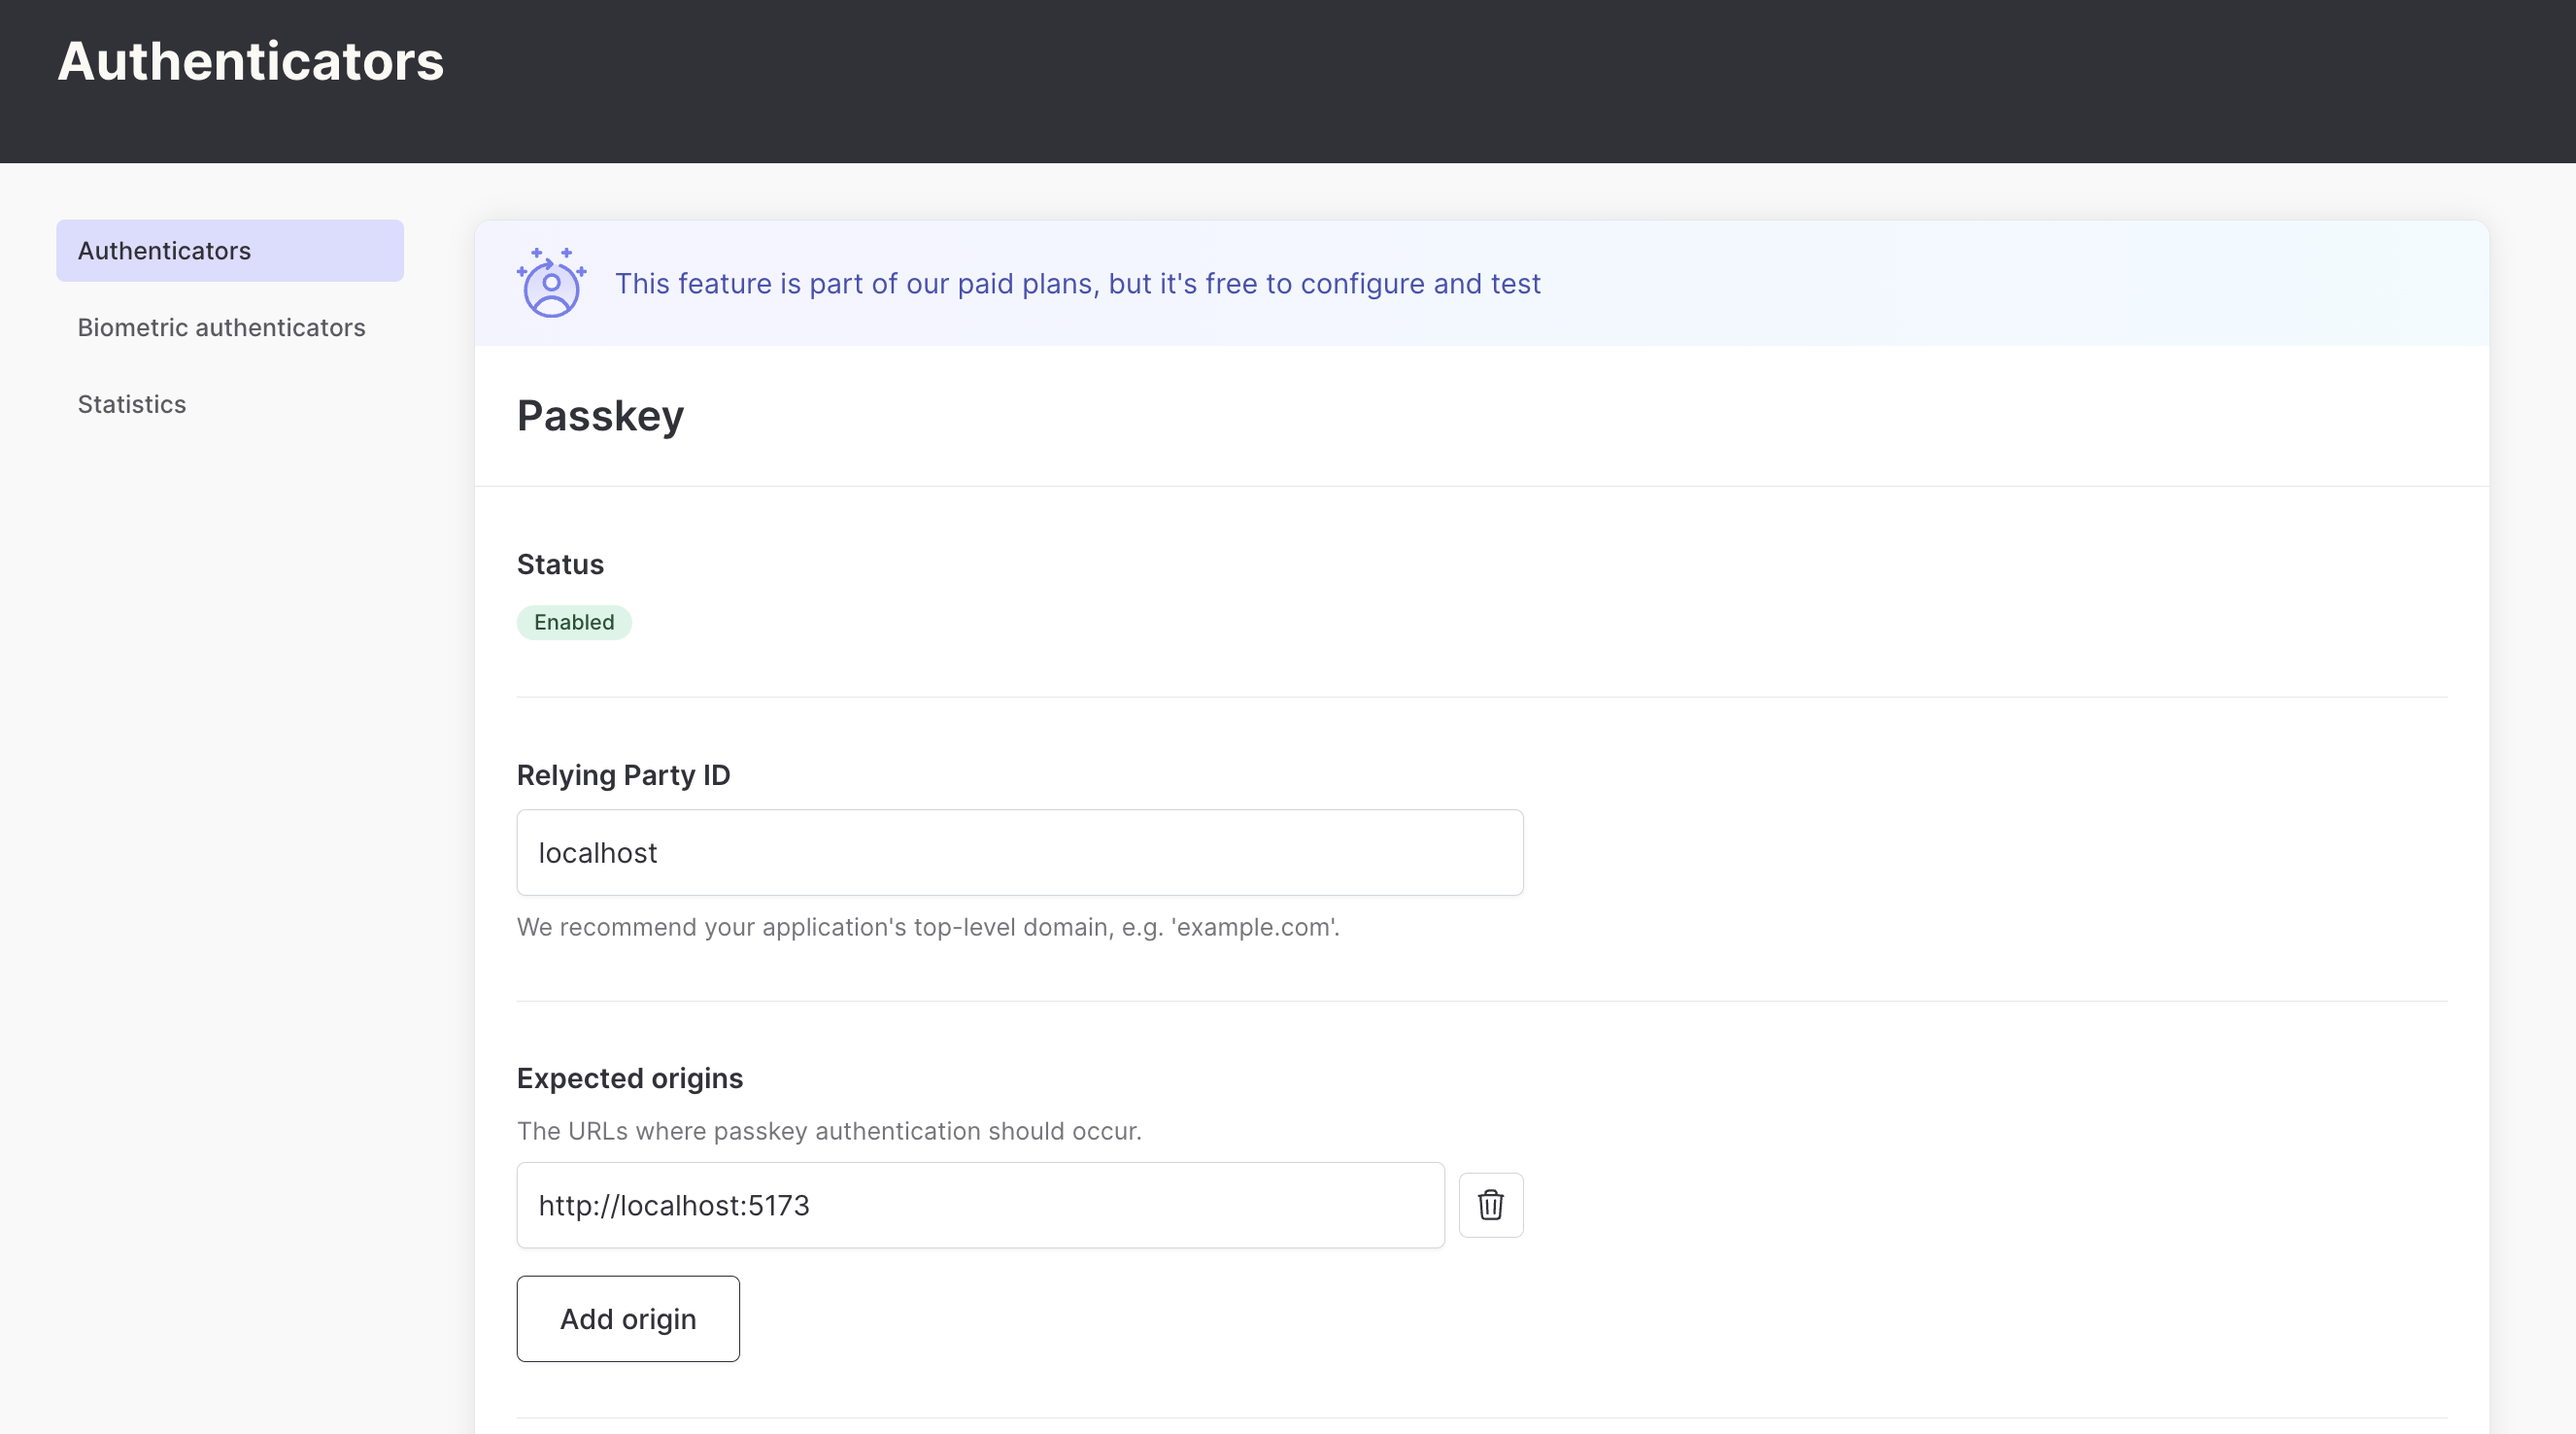
The first step is to enable passkeys as an authenticator in the Authsignal Portal. This requires defining our Relying Party or the web domain to which users’ passkey credentials will be bound. For this example, we’re running our web app locally, so we’ll set it to localhost - but when you’re ready to ship to production, you would set this to a real domain.
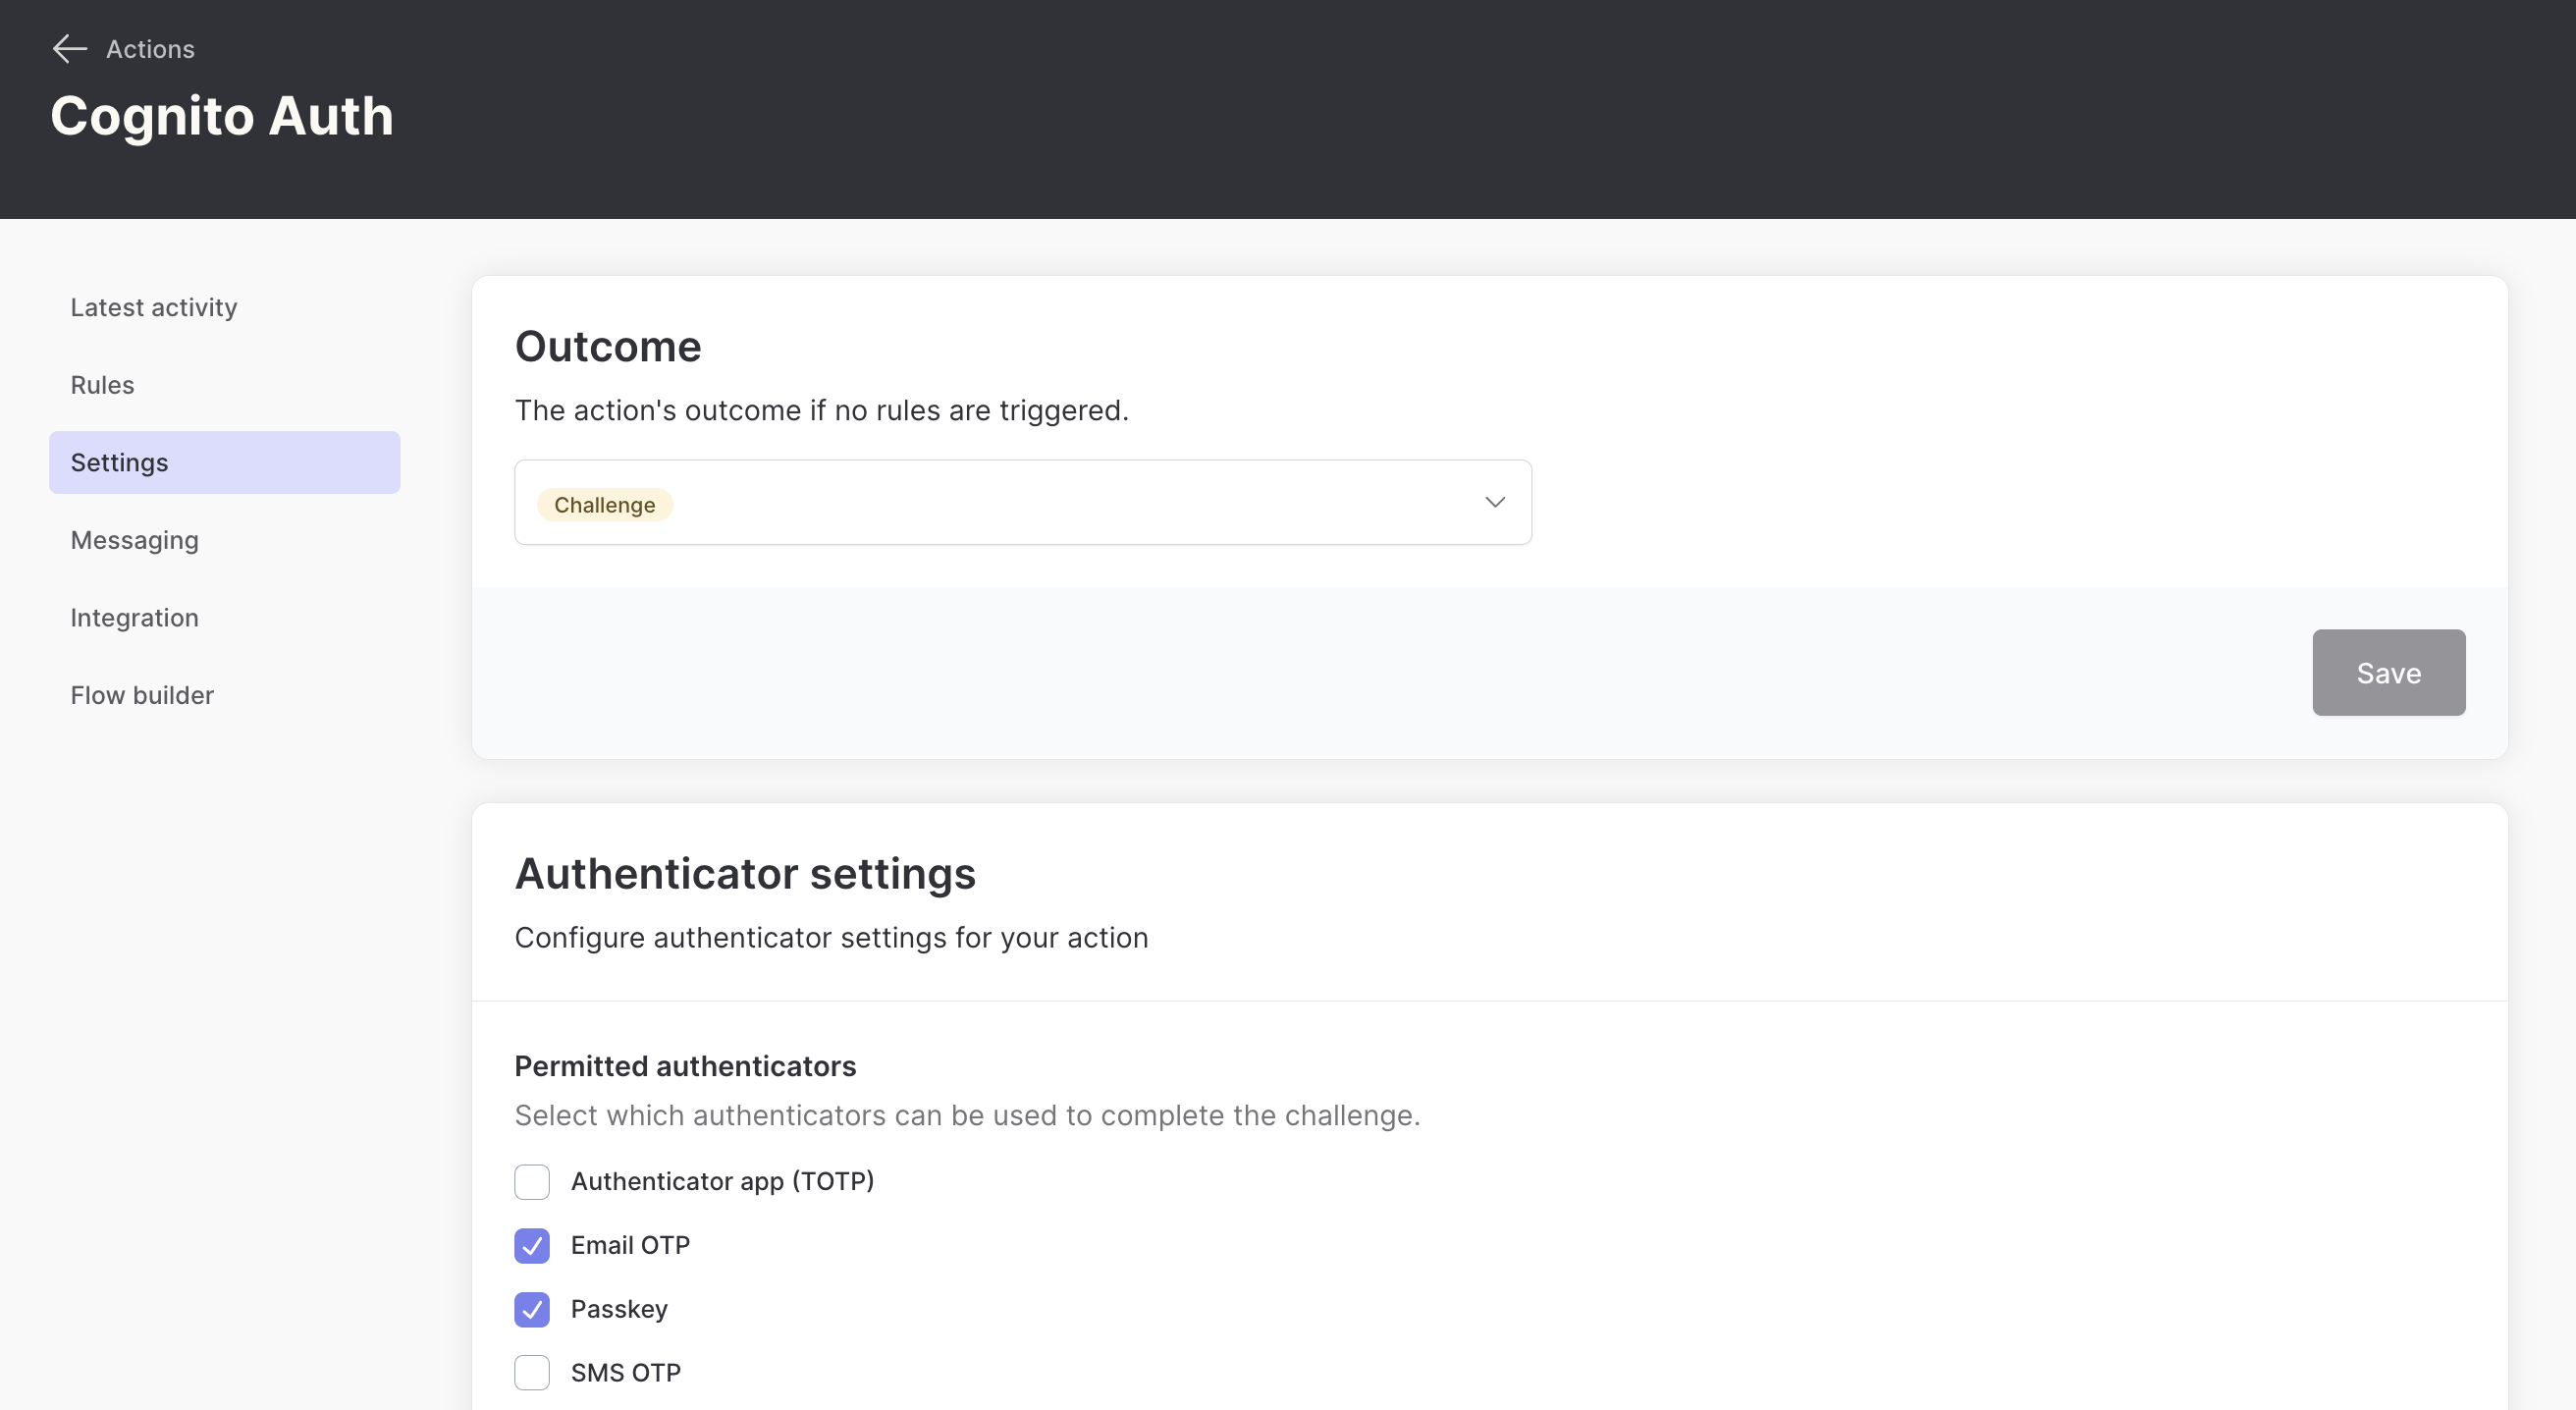
Next, we want to configure our cognitoAuth action so that passkey is permitted as a valid authentication method.
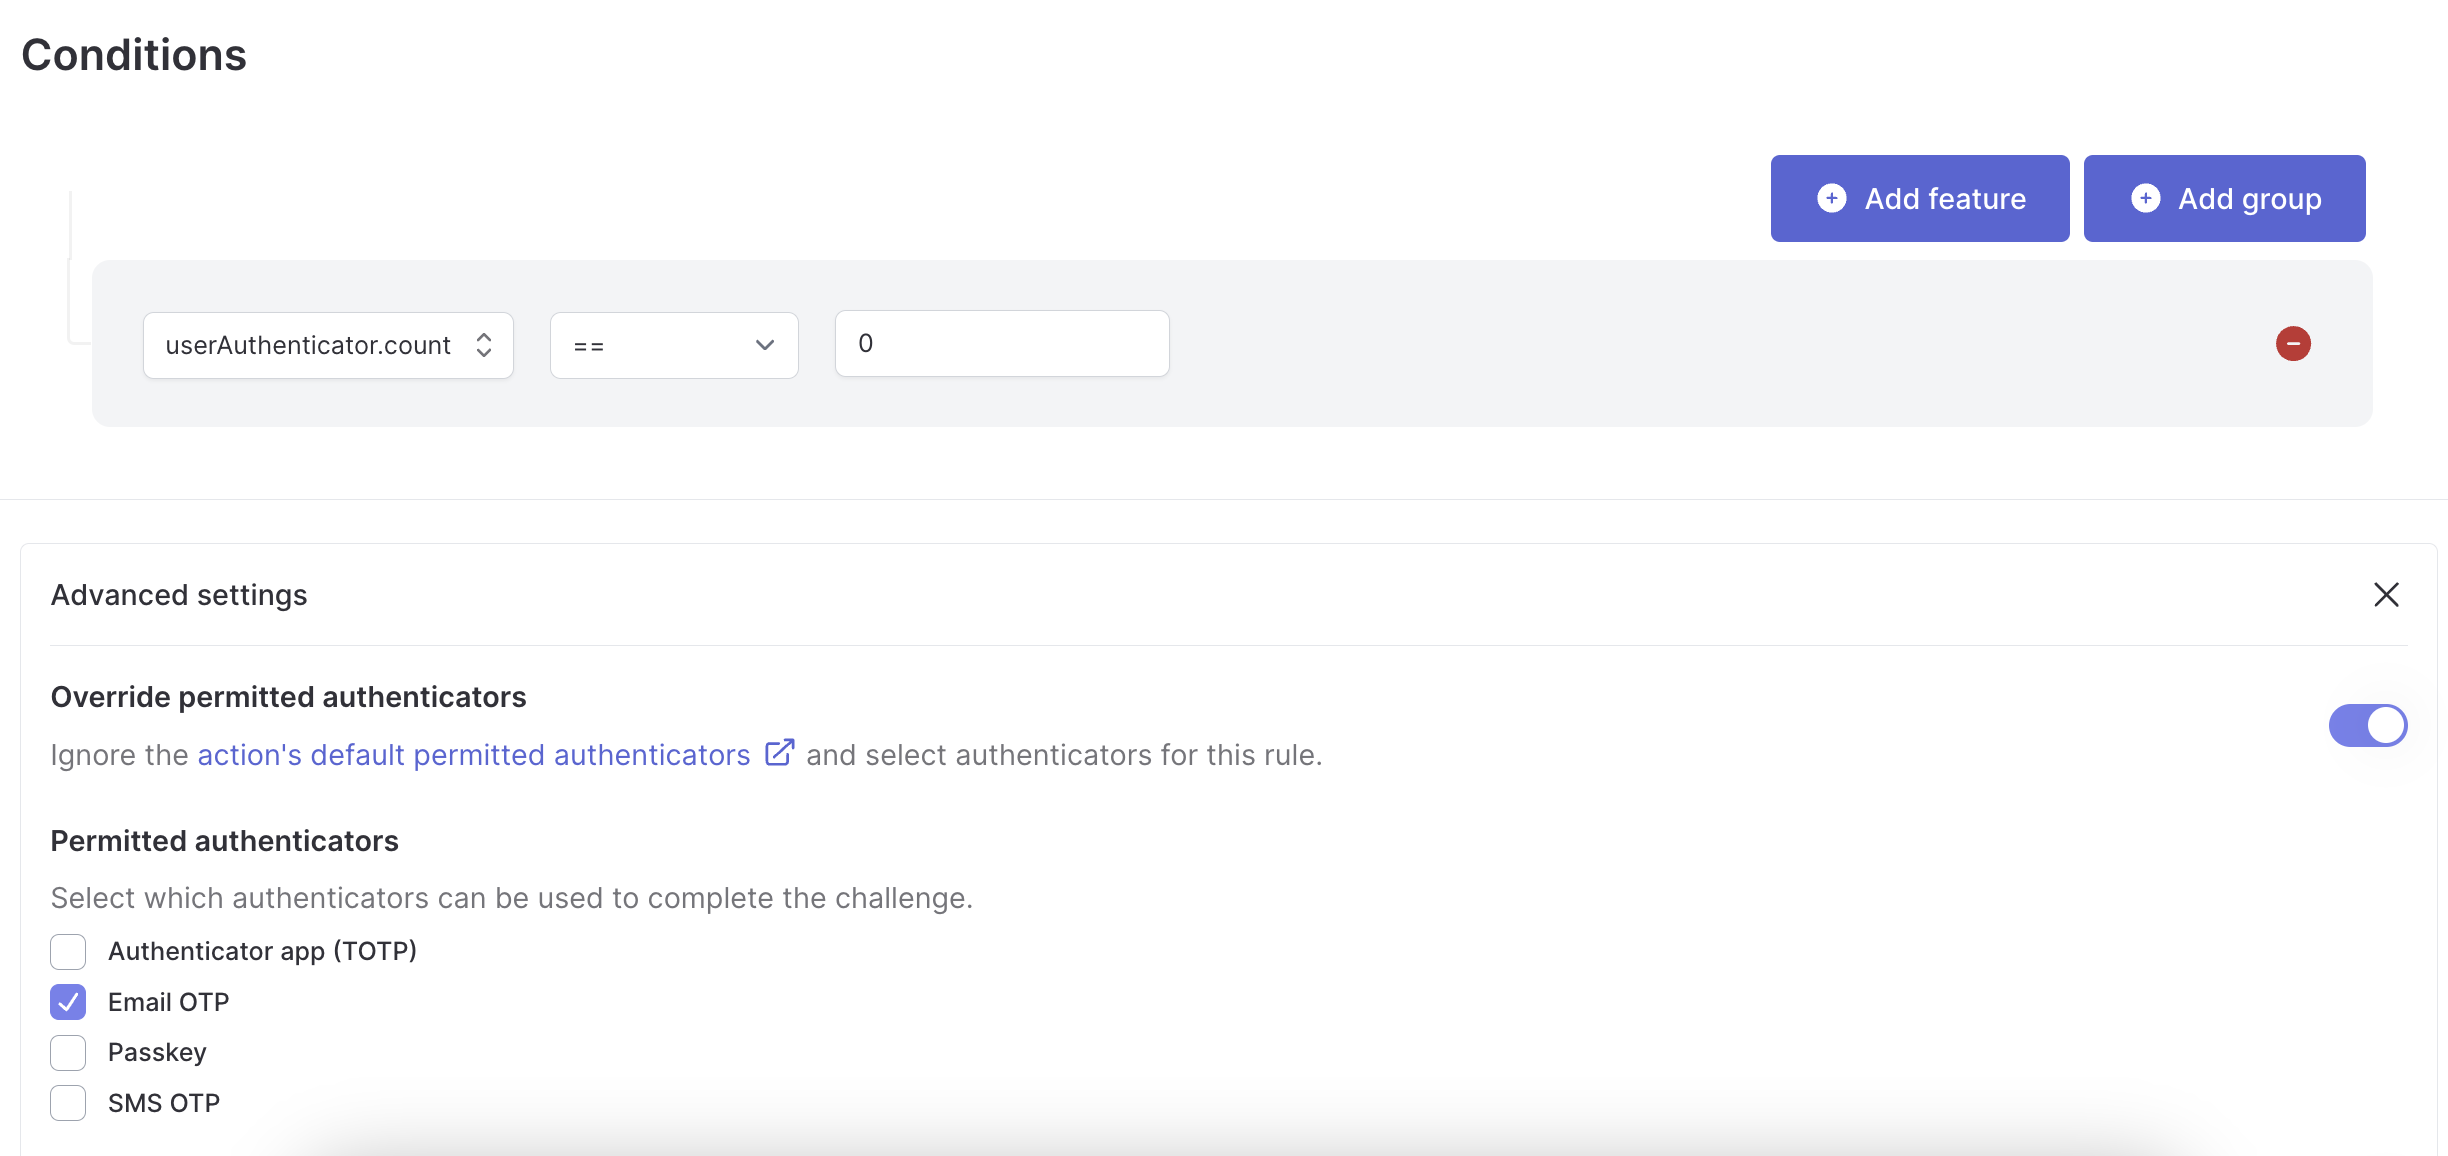
Finally, we’ll create a rule for this action to ensure that email OTP has to be registered as the first authentication method. We know that users will always have a recovery method if they ever find themselves in a situation where they can’t use their passkey.
Modifying the app code
To support passkey autofill, we first need to add autoComplete="webauthn" as an additional attribute on the input field on our sign-in page. This tells the browser that the input can autofill passkeys.
Next, we need to add a useEffect hook to our sign-in page, which initializes our input field when the page loads.
useEffect(() => {
	authsignal.passkey
	  .signIn({ action: "cognitoAuth" })
	  .then(handlePasskeySignIn)
	  .then(() => navigate("/"));
}, [navigate]);
When a user focuses the input field and authenticates with a passkey, the handlePasskeySignIn function will be called with a response from the Authsignal SDK, which includes the username and a validation token. We pass these to the Amplify SDK’s signIn and confirmSignIn methods one after another.
type PasskeySignInResponse = {
  token?: string;
  userName?: string;
};

async function handlePasskeySignIn(response?: PasskeySignInResponse) {
  if (!response?.token || !response?.userName) {
    return;
  }

  await signIn({
    username: response.userName,
    options: {
      authFlowType: "CUSTOM_WITHOUT_SRP",
    },
  });

  await confirmSignIn({
    challengeResponse: response.token,
  });
}
We also want to prompt the user to create a passkey the next time after they sign in by completing an email OTP challenge. We do this by adding a useEffect hook to our home page.
async function promptToCreatePasskey() {
	const token = localStorage.getItem("authsignal_token");

	const isPasskeyAvailable = await authsignal.passkey.isAvailableOnDevice();

	if (token && !isPasskeyAvailable) {
	  await authsignal.passkey.signUp({ token });
	}
}

useEffect(() => {
  promptToCreatePasskey();
});
The Authsignal SDK requires an authenticated user token to create a passkey. For convenience, we’re saving the token returned after a successful email OTP challenge in local storage and using this to authorize creating the passkey. This token is valid for 10 minutes; you can also generate a new one from your backend.
Modifying the lambda code
The only lambda code change required from the previous example is that we need to check for an active passkey challenge in the Create Auth Challenge lambda.
export const handler: CreateAuthChallengeTriggerHandler = async (event) => {
  const userId = event.request.userAttributes.sub;
  const email = event.request.userAttributes.email;

  // Check if a challenge has already been initiated via passkey SDK
  const { challengeId } = await authsignal.getChallenge({
    action: "cognitoAuth",
    userId,
    verificationMethod: VerificationMethod.PASSKEY,
  });

  const { url } = await authsignal.track({
    action: "cognitoAuth",
    userId,
    email,
    challengeId,
  });

  event.response.publicChallengeParameters = { url };

  return event;
};
This change means that the lambda will now work both for email OTP challenges via the Authsignal pre-built UI and for passkey challenges.
Summary
In this blog post, we’ve shown how to add support for passkey login in your web app when using Authsignal with AWS Cognito. This only requires a relatively small amount of changes to the email OTP example outlined in the previous blog post. The approach we’ve taken also means that email OTP will be available as a recovery or backup option in edge cases where the user’s passkey isn’t available.


.svg)
